Home » Becoming Craftastic » Page 6

Category: Becoming Craftastic

Pumpkin Thanksgiving Place Cards

Pumpkin Thanksgiving Place Cards

Holy cow… Thanksgiving is coming like a freight train this year!  I feel like we were just in summer mode and now we’re approaching Thanksgiving.  Generally, holidays for us include lots and lots and lots of family and friends.  To give you an idea of how much family we’re talking about, my sister has volunteered to host Thanksgiving this year and there will be about thirty people attending.  A few nights ago, she gave me a call and asked if I would help out with place cards for Thanksgiving dinner… and a blog post was born about how to make Pumpkin Thanksgiving Place Cards!

What you will need for Pumpkin Thanksgiving Place Cards:

  • Yarn – Red Heart Soft Tangerine
  • Pompom Maker – optional – you could just use your hand or a piece of cardboard
  • Scissors
  • Pipe Cleaners
  • Card Stock – you could use construction paper, upcycle brown paper bags, etc.
  • Glue – hot glue, glue dots, tacky glue, etc.

Instructions for Pumpkin Thanksgiving Place Cards:

Step 1:  Make the pompom according to the pompom maker’s instructions.

Step 2:  Cut the pipe cleaner in half and take one of the pieces and loop it through the string that you used to tie the pompom.  Twist twice at the base of the pumpkin.

Step 3:  I left one part of the pipe cleaner straight (for the stem portion) and then the other part of the pipe cleaner I bent into a leaf shape.  Feel free to get creative here!

Step 4:  Trim up the pompom pumpkin then sit aside.

Step 5:  I freehanded a flag on the card stock and then cut it out.

Step 6:  I wrote the person’s name on the flag.

Step 7:  Glue the flag to the stem of the pompom pumpkin.

thanksgiving-pumpkin-place-cards-overview-dreams-and-caffeine

You now have adorable Pumpkin Thanksgiving Place Cards for your special Thanksgiving dinner.  These little guys are quick to create, cheap to make, and adorable!  Once dinner is done, you can remove the stem and flag and let the kiddos have a blast with them.

I hope you have a lovely Thanksgiving and as always, if you have any questions on the tutorial, feel free to ask!

Cheers,
Lisa

This post contains affiliate links that, when clicked on and purchased, helps support my family.  Thank you very much!

Stylish Elastic Hair Ties - Dreams and Caffeine

Stylish Elastic Hair Ties

Have you seen these adorable elastic hair ties that are all over Etsy and Pinterest?  They are so cute and fun.  They come in all different colors and patterns, plus, they don’t cause any damage to your hair like the old-school hair ties.  The ties also decorate your wrist when you’re not wearing them.

With the holidays just around the corner, these elastic hair ties make great stocking stuffers for family, as well as the perfect small thank-you gifts for teachers and friends.  I thought it would be fun to share a tutorial on how to make them.  Of course, if you’re not the crafty type and would rather just purchase them, soon you’ll be able to visit my Etsy shop and buy them there.

Supplies needed for elastic hair ties tutorial:

  • Scissors
  • Elastic Cord
  • Measuring Tape

stylish-elastic-hair-ties-supplies-dreams-and-caffeine

Now on to the instructions…

Step 1
Select your elastic cord and cut a piece measuring 8 ½ inches long.

stylish-elastic-hair-ties-length-dreams-and-caffeine

Step 2
Fold the elastic cord in half and tie a loose knot on the end where the two ends meet.  Make sure you don’t tighten it yet.

stylish-elastic-hair-ties-folded-dreams-and-caffeine

Step 3
Measure the diameter of the inside of the circle.  It should measure about 3 inches.  Once you achieve that measurement, move onto Step 4.

Step 4
Tighten the knot, then trim the ends.  I like to trim the ends at an angle to give the hair tie a little more finished look, but feel free to trim them however you would like.

stylish-elastic-hair-ties-tied-dreams-and-caffeine

As Miss Sassy Pants would say, TA-DA!  You now have a pretty, non-damaging, elastic hair tie that is perfect for yourself or for a gift.

stylish-elastic-hair-ties-finished-product-dreams-and-caffeine

I hope you liked today’s post!  If you do end up following this tutorial, I would love to see pictures of your finished project. Also, stay tuned for more tutorials as I gear up for the holidays.

Cheers,
Lisa

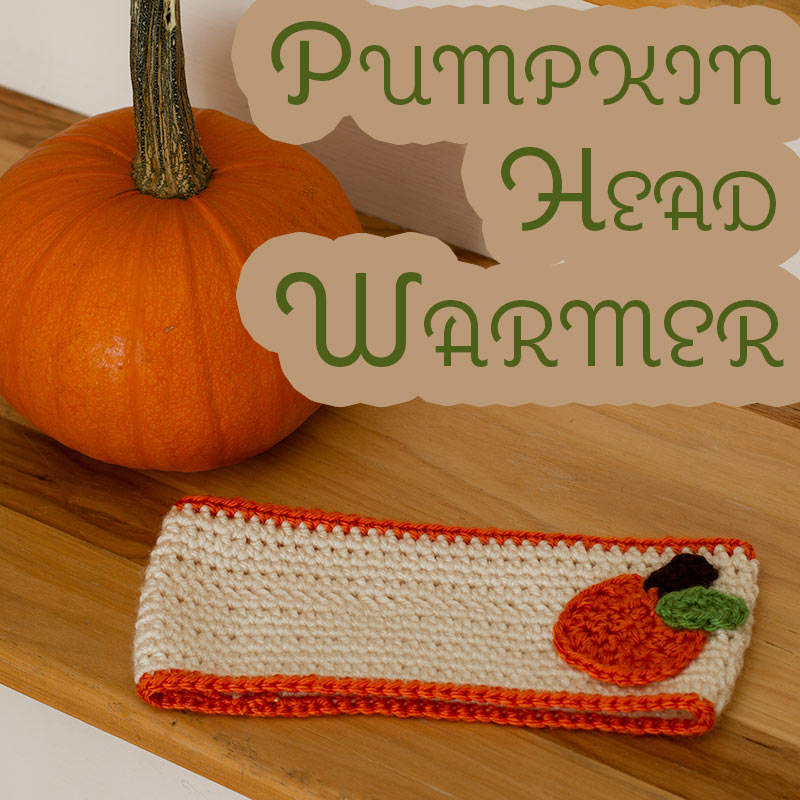
pumpkin-head-warmer-dreams-and-caffeine

Pumpkin Head Warmer Crochet Pattern

Welcome everyone and I am pleased to say, HAPPY FALL!  It is my absolute favorite season… I love the cool, crisp weather, the rain, wearing sweaters, boots, and of course, head warmers.  Keeping with the season and gearing up for the pumpkin patch, I decided it was time to share my crochet Pumpkin Head Warmer!

Now the pattern that I am sharing will fit a toddler (completed project measures 18 inches in circumference).  If you would like a different size, just chain until your chain measures to the size you want.  Here is a quick reference guide for sizing.

Toddler             16” – 18”
Child                  17” – 19”
Teen                  18” – 21”
Adult                 20” – 22”

Supplies Needed to Complete Project:

  • Hook G 4.00 mm
  • Yarn:  I used Red Heart Soft in Off White, Tangerine, Chocolate, and Guacamole
  • Yarn Needle
  • Scissors
  • Measuring Tape

The Pumpkin Head Warmer: Toddler Size 18 inches

Using the OFF WHITE yarn, Chain 70, join with a slip stitch (careful not to twist)

*This pattern is worked in the round

Round 1:  ch 2, hdc in each stitch around then slip stitch into the first hdc.

Round 2:  ch 1, sc in in each stitch around then slip stitch into the first sc.

Round 3:  ch2, hdc in each stitch around then slip stitch into the first hdc.

Round 4:  ch 1, sc in each stitch around then slip stitch into the first sc.

Round 5:  ch 2, hdc in each stitch around then slip stitch into the first hdc.

Round 6:  ch 2, dc in each stitch around then slip stitch into the first dc.

Round 7:  ch 2, hdc in each stitch around then slip stitch into the first hdc.

Round 8:  ch 1, sc in each stitch around then slip stitch into the first sc.

Round 9:  ch 2, hdc in each stitch around then slip stitch into the first hdc.

Round 10:  ch 2, hdc in each stitch around then slip stitch into the first hdc.

CHANGE COLORS TO TANGERINE

Round 11:  ch 1, sc in each stitch around then slip stitch into first sc.

Cut yarn and weave in ends.

Round 12:  Attach TANGERINE yarn with a slip stitch to the bottom of the head warmer and ch 1, sc in each stitch around then slip stitch into the first sc.

Cut yarn and weave in ends.

Pumpkin

*Chains count in total stitch count.

Using the TANGERINE yarn, make a magic ring,

Round 1:  ch 2, 8 hdc in the magic ring, slip stitch into the top of ch 2 (9 total stitches)

Round 2:  ch 2, hdc in ch 2 spot, then 2 hdc in each stitch around.  Slip stitch into the top of ch 2  (18 total stitches)

Round 3:  ch 2, hdc in next 4 stitches, then place 2 hdc in next 2 stitches, then place 3 hdc in next stitch, then 2 hcd in next stitch, then 2 hdc in next stitch, then 3 hdc stitches in next stitch, then 2 hdc stitches in next stitch, then place 1 hdc in the next 4 stitches… so far you should have a total of 23 stitches.

CHANGE COLORS TO CHOCOLATE – you will be starting the stem now.

sc in next 2 stitches, ch 1 and turn

Round 4:  sc in next 3 stitches, ch 1 and turn

Round 5:  sc in next 3 stitches, cut yarn and weave in ends.

Leaf

Using the GUACAMOLE yarn, ch 5, sc in 2nd ch from the hook and the next 2 stitches.

4 sc stitches in the last chain spot, then sc in the next 3 stitches, slip stitch into the first sc. Cut yarn, making sure to leaving a long enough tail to sew the leaf to the head warmer.

Finally, all parts of the head warmer are completed!  Now it’s time to assemble it.  I put the seam in the back then placed the pumpkin on the front angled on the left side.  I used some tangerine yarn and sewed the pumpkin portion onto the head warmer.  Then I used chocolate yarn to sew the stem portion on.  Using the tail from the leaf, I sewed the leaf on, then weaved in all lose ends.  You now have an awesome Pumpkin Head Warmer for your adorable little pumpkin.  Please feel free to sell head warmers made from this pattern, but please do not sell this pattern.  I would love and appreciate a link back to this page if you do sell items made from my pattern.

As always, if you have any questions or issues with the pattern, please feel free to contact me and I will do my best to help.  If you do make a head warmer, I would love for you to share it!

Cheers to Pumpkins,
Lisa


Top 5 Crochet Blogs for Free Patterns - Dreams and Caffeine

Top 5 Crochet Blogs for Free Patterns

I couldn’t help but notice when I looked at my planner today how close we are to the holiday season.  It is amazing how fast time flies.  That’s why today’s post points you to my top 5 crochet blogs for free patterns.  With keeping the holidays in mind, I decided it was time to start making my holiday gift list.  I started “Pinterest-ing” (seriously, what did we do before we had Pinterest???) and decided on a few crochet projects that I thought would make great gifts… which then made me think about this post.

Without further ado, here are my top five crochet blogs that offer free patterns

  1. Repeat Crafter Me {http://repeatcrafterme.com}
    I absolutely love this blog!  She has amazing patterns that comes in a variety of sizes.  This is actually one of the first blogs I used when I first learned to crochet.  I loved how many different patterns she had and how fun they were, plus, she has a ton of holiday projects… which is perfect for the holiday-obsessed crocheter.
  1. Hopeful Honey {http://www.hopefulhoney.com}
    This blog offers adorable and fun patterns for all ages!  I’m a huge fan of her Disney inspired crochet projects.  They have made wonderful gifts that are fun and useful for the little ones.
  1. Posh Patterns {http://poshpatternsblog.com}
    Posh Patterns offers a variety of free patterns, but the ones I love the most are the cowls and scarves.  I also love the color combos she uses… great inspiration!
  1. ELK Studio {http://elkstudiohandcraftedcrochetdesigns.com}
    This site has tons of great winter wear (hats, scarves, gloves) that include nice projects for men.  As we all know, decent crochet projects for men are hard to come by, so check out this site.
  1. Mama in a Stitch {http://www.mamainastitch.com}
    She offers a variety of different patterns, but my favorite is the Icelandic blanket.  It’s beautiful and is definitely going to be one of the patterns I use this holiday season to make gifts.

The Velvet Acorn {http://www.thevelvetacorn.com} is one of my favorite places to purchase crochet or knit patterns.  She has great patterns that are beautiful and come in most sizes from newborn all the way up to adult 3XL.  The patterns are reasonably priced and she is great about answering any questions you may have regarding your purchases.

Well folks, that is all for today!  I hope everyone takes a peek at these crochet blogs and what they have to offer.  Happy Holiday Crocheting!

Cheers,
Lisa