Home » Becoming Craftastic » Page 5

Category: Becoming Craftastic

Wanderlust CAL Week 1 - The Happy S'more

Wanderlust CAL Week 1 – The Happy S’more

Welcome to the first release of the Wanderlust CAL!  I decided to kick things off right with the Happy S’more square!  I have provided two square options this week…the Smiling Happy S’more OR the Happy S’more (no face).  Both are adorable and oh so fitting for the Wanderlust CAL.  I figured the Happy S’more had to be the first release because who doesn’t love s’mores?!

Keep in mind, the Wanderlust CAL can be personalized.  You can decide to do each release and have a large blanket to snuggle under or you can just do some of the squares and make a lap blanket, baby blanket, or pillows!  You can also personalize each release with whatever colors suit your style… really, the possibilities are endless with this Cal.  I will be providing the colors I chose to use on my squares, but again, feel free to get creative and share!

Supplies Needed:

  • Red Heart Yarn – Medium Weight (4)
    • Colors for Smiling S’more:  Black Super Saver, Heather Gray Super Saver, Light Raspberry Super Saver, Buff Super Saver, Coffee Super Saver, Red Heart Sparkle Soft White
    • Colors for S’more (no face):  Heather Gray Super Saver, Buff Super Saver, Coffee Super Saver, Red Heart Sparkle Soft White
  • Hook Size:  G or H
  • Yarn Clips
  • Scissors
  • Yarning Needle
  • The Happy S’more Graph – Smiling S’more
  • The Happy S’more Graph – No Face S’more

Stitch Options

  • Bobble *** I will be using the bobble stitch for the Wanderlust CAL
  • C2C
  • Mini C2C

Facebook

I have a private Facebook group (Wanderlust CAL) for everyone that would like to participate in the Wanderlust CAL.  My hope is that the Facebook group will allow us to share our creativity with yarn choices as well as with the type of stitch you decide to use.  It will also act as an avenue to ask questions if we run into issues.

Wanderlust CAL Schedule

I will continue to release on Fridays, so that you can get your yarn on the weekend and still have time to complete the square.

Official Hashtag for sharing on Instagram:

#wanderlustcal and I would love for you to share your progress along the way as well as your finished piece(s).  I really put a ton of heart into this project and I would love to see everyone’s creativity with each square release.

Giveaways!

I am very excited about this adventure and I want a group of hookers to share this project with, so I have decided to offer up giveaways along the way.  Hope this keeps everyone participating motivated to complete this Wanderlust CAL.  Please be sure to follow me on instagram (@DreamsandCaffeine) and on Facebook (DreamsandCaffeine) to not miss out.

Blog Sign Up

I would recommend and appreciate you subscribing to my blog.  This will ensure you will not miss a release or any information regarding the Wanderlust CAL.  If you do subscribe, don’t forget the double opt in for signing up for the blog.  When you initially sign up, you will receive an email that you need to verify you do want to sign up for my blog.  Once you do that, you should receive my emails.  However, if you don’t see it in your inbox, be sure to check your junk mail.

Subscribe to Dreams and Caffeine

I am providing this as a FREE pattern for you to use.  You may sell any finished items made with this pattern, but I would love a link back to this post.  Please do not sell or repost this graph as your own.  Thanks!

Please remember I will be doing the Wanderlust CAL along with you.  This means I have not completed it ahead of you.  If you run into issues or have questions, please feel free to email me or post in the Wanderlust CAL Facebook group.  Please share and encourage anyone you know that enjoys crocheting to join us.  IT’S GO TIME!

Let’s Get Hooking!
Lisa


Wanderlust CAL Week 1The Happy S'more


Wanderlust Crochet Along

Wanderlust Crochet Along – Join Today!

Recently I have really been getting back into the groove of crocheting and have seen a ton of crochet alongs (CAL).  Someone creates a pattern and then releases it in segments for everyone to crochet together.  I absolutely fell in love with this idea because I don’t live near anyone that crochets.  In general, I crochet by myself and even when I share my projects with others, I can’t really share the details of how I created it or what was difficult, because they have no idea what I am talking about.  So, I’ve decided its time I jump on this bandwagon of CALers and create my own pattern to share!  Enter the Wanderlust Crochet Along!

Wanderlust… such a wonderful word!  I love the meaning and I love that it makes my heart happy.  Since I am in the amazing PNW and our family loves the outdoors and all it offers, I decided to base my Wanderlust CAL off of my surroundings.  The great thing about the Wanderlust CAL is that you have plenty of opportunity to personalize it or make it your own.  You can decide to do each release and have a large blanket to snuggle under or you can just do some of the releases and make a lap blanket, baby blanket, or pillows!  You can also personalize each release with whatever colors suit your style… really, the possibilities are endless with this CAL.

Now let’s get down to the details!

What you will need

  • Yarn clips – I highly recommend using these
  • Scissors
  • Yarning Needle
  • Crochet Hook: G or H
  • Yarn – Medium weight (size 4) yarn
    • I am using Red Heart Super Saver, but feel free to use whatever yarn brand you prefer, so long as the yarn weight is the same.  Feel free to mix types of yarn as well… the possibilities are endless.  I have a heard a lot of good things about I Love This Yarn at Hobby Lobby, so you may want to consider this brand as well.

Stitch Options

  • Bobble – If you are not familiar with this stitch, please check out Ashleigh at Sewrella.  She has a great tutorial on it.
  • C2C – Sarah at Repeat Crafter Me is the queen of C2C graphgans!  Here is a detailed tutorial on the C2C technique.
  • Mini C2C – Angela at Chaos & Chop Suey has a video that demonstrates the mini C2C stitch.

Need to Know How to Color Change

  • Bobble Stich – Sarah at Repeat Crafter Me has an awesome tutorial (with video) on color change for the bobble stitch.  Definitely worth reviewing before starting the Wanderlust CAL.
  • C2C & Mini C2C – Jess at Make and Do Crew has a detailed post on how to color change in C2C, which is definitely worth checking out if you are not familiar with it.

Releases

I will release on Friday mornings in hopes of giving you the weekend to supply shop and get a head start on that week’s release.  I will also provide the colors I have selected for that week’s release, but feel free to use your own for your square.

Square Size

Size will vary depending on the hook size you select and the type of stitch you decide to use.  I will be using the bobble stitch and size H hook.  As we get started we can each share how large our squares are based on the hook size and type of stitch we each chose to use.

Bonus & Alternate Releases

Some weeks I will provide bonus squares and other weeks I will provide alternate squares.  There will also be a header and footer release.  Feel free to do them all or only do the ones you like.  This is the beauty of this Wanderlust CAL, you can make it your own.

Facebook

I will have a private Facebook group for everyone that would like to participate in the Wanderlust CAL.  My hope is that the Facebook group will allow us to share our creativity with yarn choices as well as with the type of stitch we decide to use.  It will also act as an avenue to ask questions if we run into issues.

Official Start Date

The first release will be on Friday, September 29th.

Wanderlust CAL Schedule

I will release each pattern on Fridays.  My goal for the Wanderlust CAL is to have the last release be on Friday, December 8th.  This way if you would like to give it as a gift you have time to finish the last square, block, and sew it together, with just enough time to wrap and put under the Christmas tree.

Tips and Tricks

WEAVE IN ENDS AS YOU GO ALONG!!!!  I promise it will make your life way easier once you’ve completed the Wanderlust CAL!

Official Hashtag for sharing on Instagram

#wanderlustcal and I would love for you to share your progress along the way as well as your finished piece(s).

Blog Sign Up

I would recommend subscribing to my blog so you will not miss a release.  Don’t forget the double opt in for signing up for the blog.  When you initially sign up, you will receive an email and you’ll need to click the link to verify you do want to sign up for my blog.  Once you do that, you will receive my emails.  However, if you don’t see it in your inbox, be sure to check your junk mail.

I will be doing the Wanderlust CAL along with you, which means I have not completed it ahead of you.  Please keep checking back… I will start posting portions of the Wanderlust CAL so you will know what it looks like before starting.  I am so excited!  Please share and encourage anyone you know that enjoys crocheting to join us.  Friday, September 29th is go time!

Cheers,
Lisa


Wanderlust Crochet Along
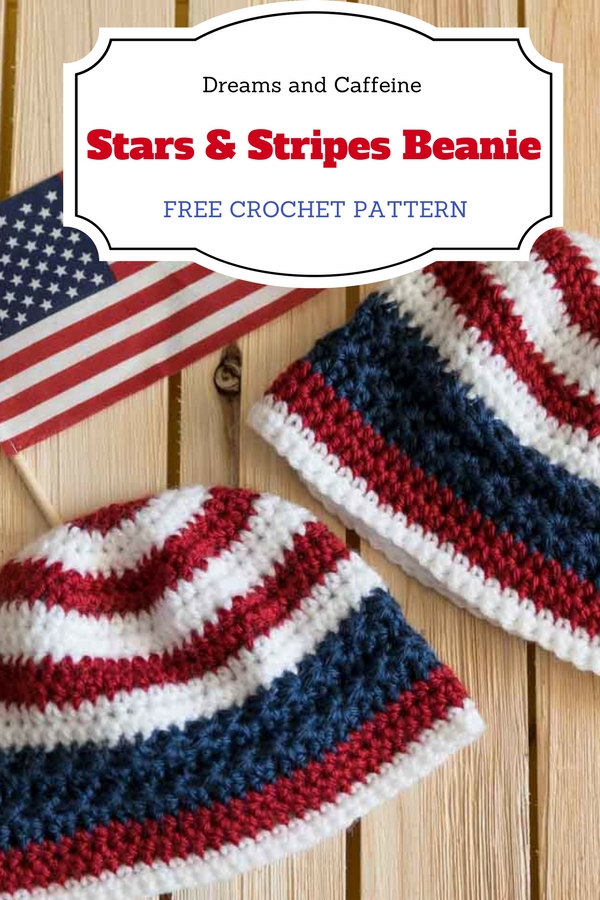
Stars and Stripes Crochet Beanie - FREE Pattern

Stars and Stripes Beanie – Free Crochet Pattern

Hello, hello, hello my friends!  It is a lovely Friday and we are gearing up for a nice hike as a family.  After such a slow start to summer, we’re trying to take advantage of every sunny day that comes our way.  However, before kicking off our family fun day, I thought I would share my newest crochet project with my awesome readers!  The Stars and Stripes Beanie and just in time for Independence Day!

I am super excited because my entire family loves the 4th of July.  Delicious food, family & friends, and FIREWORKS!!!  It also means being outside after dark in the chilly air of the Pacific Northwest.  Since I am the annoying mom that loves to have her kiddos decked out in holiday gear, I just hate it when I have to add mismatched weather gear so my little ones won’t freeze.  This year I decided I would beat the weather and design some hats to keep my littles cozy and holiday cute while watching the fireworks.

This pattern works up quickly and it uses my favorite stitch… the star stitch!  Feel free to sell on a small scale any beanies you make from this pattern, but please do not sell my pattern nor use my pictures.  I would greatly appreciate a link back to this post, but it’s not a requirement… just appreciated!

Sizing for Stars and Stripes Beanie:
This beanie fits an average toddler between the ages of one to three years old.  If you would like a different size, you can increase or reduce the number of increasing rounds and you can do the same for the length.

Stars and Stripes Beanie Supplies:
I Hook
Red Yarn – I used Caron Simply Soft Autumn Red
White Yarn – I used Vanna’s Choice White
Blue Yarn – I used Caron Simply Soft Dark Country Blue
Yarn Needle
Scissors

Notes & Stitches
*Chains do not count in total stitch count
Magic Ring
Chain – ch
Slip Stitch – ss
Half Double Crochet – hdc
Star Stitch
Single Crochet – sc
Reverse Single Crochet – rsc

Stars and Stripes Beanie Crochet Pattern:
Magic Ring
R1:  RED YARN
Ch2, 10 hdc, ss in top of first hdc
(10 total stitches)

R2:  RED YARN
Ch2, 2hdc in each stitch, ss in top of first hdc
(20 total stitches)

R3:  WHITE YARN
Ch2, *2hdc in first stitch, 1hdc in next stitch* repeat ** around, ss in top of first hdc
(30 total stitches)

R4:  WHITE YARN
Ch2, *2hdc in first stitch, 1hdc in next 2 stitches* repeat ** around, ss in top of first hdc
(40 total stitches)

R5:  RED YARN
Ch2, *2hdc in first stitch, 1hdc in next 3 stitches* repeat ** around, ss in top of first hdc
(50 total stitches)

R6:  RED YARN
Ch2, *2hdc in first stitch, 1hdc in next 4 stitches* repeat ** around, ss in top of first hdc
(60 total stitches)

I STOPPED INCREASING HERE… hat diameter was 5 inches.  Be sure your total stitch count is an even number.

R7 – R12:  Alternate WHITE and RED Yarn every two rows
Ch2, 1hdc in each stitch, ss in top of first hdc

Once you have completed the 12th row, you will now begin the star stitch.  I do want to reference The Spruce as a resource for learning how to crochet the star stitch if you do not already know how to crochet it.

Star Stitch – this is a two-row stitch.  The first row of stitches will build the top half of the star and the second row of stitches will finish the bottom half of the star.  The star stitch needs to be completed on an even number of stitches.

First star stitch of the round…
Insert your hook into the 2nd chain from your hook and pull up a loop.  Insert your hook into the 3rd chain from your hook, and pull up a loop.  Insert your hook into the 4th chain from your hook and pull up a loop.  Insert your hook into the first stitch, and pull up a loop.  Then insert your hook into the next stitch and pull up a loop.  Then yarn over and pull your hook through all 6 loops.  Ch 1 to finish the stitch.

The next star stitch…
Insert your hook into the ch 1 you just made and pull up a loop.  Then insert your hook into the strands on the side of the last loop made in the prior stitch and pull up a loop.  Next, you will insert your hook into the ch space that the last loops of the prior stitch were worked in and pull up a loop, then pull up a loop in the next stitch, and then pull up another loop in the next stitch.  Yarn over and pull all 6 loops through, and then ch 1 to finish the stitch.

*When pulling up all six loops, be sure to keep your yarn loose.

R13:  BLUE YARN
Ch5, around completing the top portion of the star stitch, ss in ch2 spot
(30 total top half stars)

*do not chain 1 after you close the circle on the last start stitch (right before you ss) – it will make too big of a hole.

R14:  BLUE YARN
Ch2, 2hdc in each eye spot, ss into ch2 (30 total completed stars)

R15 – R16:  BLUE YARN
Repeat R13 and R14

R17 – R18:  RED YARN
Ch2, 1hdc in each stitch, ss (60 total stitches)

R19:  WHITE YARN
Ch1, 1sc in each stitch, ss (60 total stitches)

R20:  WHITE YARN
Ch1, 1rsc in each stitch, ss, and finish off (60 total stiches), finish off and weave in ends.
Length:  7.25 inches

Stars and Stripes Beanie

If you complete this project, I would love for you to share a picture in the comment section!  If you’re looking for the perfect 4th of July tote to pack the evenings snacks while waiting for the fireworks, check out Repeat Crafter Me.  Thanks for stopping by!

Cheers,
Lisa


Stars and Stripes Crochet Beanie - FREE Pattern


Stars and Stripes Crochet Beanie - FREE Pattern
DIY Sugar Cookie Scrub - Dreams and Caffeine

DIY Sugar Cookie Scrub

I have to admit one of my favorite things about the holiday season is the amazing smells!  Seriously, you can’t walk anywhere without experiencing some type of holiday aroma!  My favorite is sugar cookie anything and everything.  I love sugar cookie diffuser blends, body lotions, hand soaps, sugar scrubs, and whatever else I can find!  Therefore, I couldn’t help but share my little DIY Sugar Cookie Scrub.

Ingredients Needed for Sugar Cookie Scrub:

  • ½ Cup Pure Cane Sugar Golden Brown
  • ½ Cup White Granulated Sugar
  • ½ Cup Organic Coconut Oil
  • ½ Teaspoon Vanilla Extract
  • ½ Teaspoon Almond Extract

Supplies Needed for Sugar Cookie Scrub:

  • Mixing Bowl
  • Measuring Spoons
  • Measuring Cup
  • Spoon
  • Fork
  • 4 oz. Mason Jars
  • Twine or Ribbon
  • Scissors

Instructions for Sugar Cookie Scrub:

Step 1:  Pour both sugars into the mixing bowl.

Step 2:  Mix the coconut oil into the sugars.  I used a fork to mix it well with the sugars.  Feel free to mix in more coconut oil if you want a wetter scrub or less if you prefer a dryer scrub.

Step 3:  Mix in the vanilla and almond extract.  Mix the scrub well!

Step 4:  Using the spoon, scoop the Sugar Cookie Scrub into the mason jars.

Step 5:  Complete the Sugar Cookie Scrub with placing the lid on and then decorating the top with ribbon or twine of your choice.

sugar-cookie-scrub-close-up-dreams-and-caffeine

This scrub has no preservatives in it, so it will keep between one to two months.  It will keep longer if kept in an airtight container.  This makes the perfect gift for family and friends.  I hope this sugar cookie scrub tutorial comes in handy this holiday season.  Please leave a comment and let me know what you think!

Cheers,
Lisa

This post contains affiliate links that, when clicked on and purchased, help support my family.  Thank you very much!