Home » Archives for Lisa » Page 7

Author: Lisa

Creating a Morning Circle Routine

Creating a Morning Circle Routine

Good morning and Happy Monday!  I know it’s been a while since I posted last, but I fully blame summer and the wonderful weather we’ve been having… it’s definitely not my fault!  Now that I am getting back into somewhat of a more normal and regimented schedule, I want to get back to posting on Rocking Motherhood Mondays!  Today, I want to discuss the basics of a Morning Circle Routine and how to create your own for your home.

Here is what my Morning Circle Includes:

I have provided the Amazon links for some of the items that I purchased for our Morning Circle.  I found that having these A Morning Circle Routine is an opportunity to teach your little one about the following items:

If you don’t want a large morning circle for your space, please check out these blogs for additional versions.

The great thing about Morning Circle Routines is how customizable they are.  Give Pinterest a quick search and I am sure you will find something that fits your needs.

How I Operate Morning Circle:

Morning Stretches

I start our morning circle with stretches.  Sometimes I just call out different types of movements (march in place, hop like a bunny, reach for the stars, etc.) or sometimes we do ABC Yoga.  Just something to get the kiddos awake and focused.  Then we sit down and move on to the Question of the Day.

Question of the Day

I try to keep these fun and creative.  I like the questions to provoke thought and creativity.  Example Question:  What would you do if it started snowing pink snowflakes right now?  Give your child a chance to explore the idea and be ready to nudge them forward if they get stuck.  Now it’s onto the calendar portion.

Calendar

We decide which day of the month it is, what day of the week it is, and then we sing the Days of the Week song.  We also figure out what day today is, what yesterday was, and what tomorrow will be.  Next, we discuss the weather and season.

Weather/Season

We look outside and use words to describe the weather.  We include opening the front door and use words to describe how the weather feels… anything to get the kiddos connecting what they feel and see into words.  During this portion, we also discuss the season that we are currently in and how we should dress for this type of weather or season.  If you have the availability, it would be fun to include dolls and different types of clothes and ask the kiddos to dress the dolls so they could go outside in the weather.  Another way would be to ask the kiddos to draw a picture of how someone should dress to go out in the weather.  Just some ideas on how you can expand this section.  Now it’s on to numbers!!!

Numbers/Counting

We count together as a group, which I vary from day to day.  Sometimes we count 1-100 or 1 to a smaller number, count by twos or threes, etc.  You can also have the kiddos decide which number they would like to count to you or you can also have kiddos volunteer to stand up and count on their own.  There are lots of fun ways to mix this section up so that it’s not the same day after day.

Songs

This is definitely one of the best parts of Morning Circle for my kiddos!  I have a mason jar full of popsicle sticks with a song written on each popsicle stick.  Each kiddo gets to pick from the jar to see which song we’ll sing.  Usually, we do a few songs, because we love singing so much.

Story Time

I end morning circle with story time.  I will try to pick out a book that will steer us toward the next activity, or one that represents something we’ll talk about on this day.  Of course, if the kiddos have an additional story they’d love to read, I’m more than happy to do that as well.  This creates a great transition for the next activity we are planning on doing.

A Morning Circle is a great teaching tool for your little ones.  It’s easy to adjust the setup to fit your child’s needs.  Please be aware of your child’s age and ability to sit still as well as their interest level.  Children learn best when the environment and material is age appropriate and when they are having fun.  Be prepared to be flexible!

As always, I would love to hear how you setup your Morning Circle Routine and how it’s working for you.  I would love it even more if you shared pictures.  Happy Rocking Motherhood Monday my friends!

Cheers,
Lisa


Creating a Morning Circle RoutineCreating a Morning Circle Routine
Germs that Sparkle... A Fun Health Lesson

Germs that Sparkle… A Fun Lesson in Health

Happy Monday my friends, and welcome to Germs that Sparkle… a fun lesson in health!  I know it’s been a little while since my last post, but the sunshine was calling and I just couldn’t bring myself to sit down and adult!  So, I decided a little break would do my soul some good, but now I’m back.  Rocking Motherhood Mondays are educational lessons for little ones that can be taught at home or in the classroom.

Since a new school year is upon us, I decided it is the perfect time to do a fun little lesson about germs and the importance of washing our hands.  In this lesson, I will demonstrate how germs are spread and how to properly wash our hands to make sure we don’t have germs on them.  I realize some of these items might seem a little icky to do a lesson about, but I promise it’s fun.

Supplies you will need to Complete the Germs that Sparkle Lesson:

  • Glitter
  • Hand Sanitizer
  • 2 Small Containers
  • Water
  • Hand Soap
  • Hand Towel
  • Kleenex

Project Setup

Fill each container with warm water and put them about six inches apart.  Place the hand soap next to the first container of warm water and then put the hand towel on the side of the other container.  You now have a hand washing station ready to use!

Germs that Sparkle… the Lesson

You will want to begin the lesson by talking to the child about germs.  Discuss what germs are and what they do to our bodies.  You will also want to talk about how germs are transferred/shared with others (coughing, sneezing, using the restroom, etc.).  CAUTION:  please be aware of the age group you are working with… you do not want to scare anyone!  If you are working with young children, keep it simple.  If you are working with older children able to comprehend the topic better, go more in-depth.

Now it’s time to get hands-on!  Have the child stand up and have them fake sneeze into their hands.  Then take the sanitizer and put a quarter-sized drop in the child’s hand.  Now put a pinch of glitter right on top of the hand sanitizer.  Explain to the child that the glitter represents “germs” from when they sneezed.  Next, have them rub the glitter and hand sanitizer all over their hands.

At this point, have the child shake hands with you or rub their hands on yours.  Show them that the germs have transferred to your hands as well.  If you’re brave, you can have them wipe their hands on a counter or something else that shows the spread.  Again, this is a great opportunity to explain and demonstrate how germs spread by having the child touch things or people before washing their hands.  They will be able to see the glitter that represents germs that we cannot see.

Now ask how we can prevent spreading germs.  Allow time for the child to give suggestions. This is an opportunity to discuss using a Kleenex or coughing/sneezing into your arm as well as the importance of washing our hands to prevent spreading germs.

Explain and demonstrate how to wash your hands using the steps below from the Centers for Disease Control:

  1. Wet hands with clean water
  2. Apply hand soap
  3. Scrub entire hand (front, back, between fingers, under nails) for a minimum of twenty seconds. I recommend having the child sing Twinkle, Twinkle Little Star or some other song that will give the time needed to properly wash hands.
  4. Rinse hands thoroughly in clean running water.
  5. Dry your hands with a clean towel or allow them to air dry.

Now have them head over to the hand washing station to practice washing the “germs” off their hands.

We had such a great time with this lesson.  I feel it really drives home the idea of germs and how they are spread, as well as the importance and how to properly wash your hands.  I would love to hear how this lesson went for you, so please feel free to comment below.  Happy Monday!

Cheers,
Lisa


Germs that Sparkle... A Fun Lesson in Health
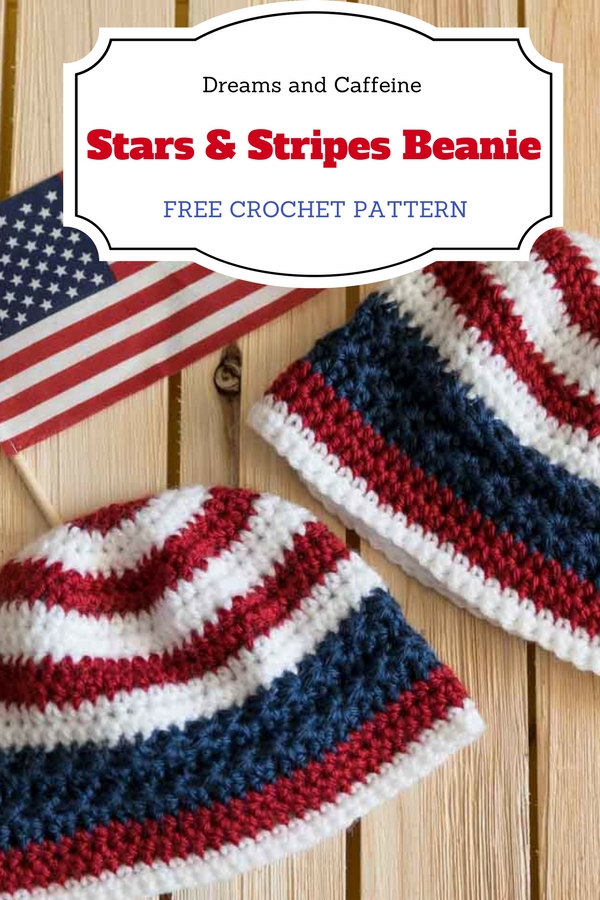
Stars and Stripes Crochet Beanie - FREE Pattern

Stars and Stripes Beanie – Free Crochet Pattern

Hello, hello, hello my friends!  It is a lovely Friday and we are gearing up for a nice hike as a family.  After such a slow start to summer, we’re trying to take advantage of every sunny day that comes our way.  However, before kicking off our family fun day, I thought I would share my newest crochet project with my awesome readers!  The Stars and Stripes Beanie and just in time for Independence Day!

I am super excited because my entire family loves the 4th of July.  Delicious food, family & friends, and FIREWORKS!!!  It also means being outside after dark in the chilly air of the Pacific Northwest.  Since I am the annoying mom that loves to have her kiddos decked out in holiday gear, I just hate it when I have to add mismatched weather gear so my little ones won’t freeze.  This year I decided I would beat the weather and design some hats to keep my littles cozy and holiday cute while watching the fireworks.

This pattern works up quickly and it uses my favorite stitch… the star stitch!  Feel free to sell on a small scale any beanies you make from this pattern, but please do not sell my pattern nor use my pictures.  I would greatly appreciate a link back to this post, but it’s not a requirement… just appreciated!

Sizing for Stars and Stripes Beanie:
This beanie fits an average toddler between the ages of one to three years old.  If you would like a different size, you can increase or reduce the number of increasing rounds and you can do the same for the length.

Stars and Stripes Beanie Supplies:
I Hook
Red Yarn – I used Caron Simply Soft Autumn Red
White Yarn – I used Vanna’s Choice White
Blue Yarn – I used Caron Simply Soft Dark Country Blue
Yarn Needle
Scissors

Notes & Stitches
*Chains do not count in total stitch count
Magic Ring
Chain – ch
Slip Stitch – ss
Half Double Crochet – hdc
Star Stitch
Single Crochet – sc
Reverse Single Crochet – rsc

Stars and Stripes Beanie Crochet Pattern:
Magic Ring
R1:  RED YARN
Ch2, 10 hdc, ss in top of first hdc
(10 total stitches)

R2:  RED YARN
Ch2, 2hdc in each stitch, ss in top of first hdc
(20 total stitches)

R3:  WHITE YARN
Ch2, *2hdc in first stitch, 1hdc in next stitch* repeat ** around, ss in top of first hdc
(30 total stitches)

R4:  WHITE YARN
Ch2, *2hdc in first stitch, 1hdc in next 2 stitches* repeat ** around, ss in top of first hdc
(40 total stitches)

R5:  RED YARN
Ch2, *2hdc in first stitch, 1hdc in next 3 stitches* repeat ** around, ss in top of first hdc
(50 total stitches)

R6:  RED YARN
Ch2, *2hdc in first stitch, 1hdc in next 4 stitches* repeat ** around, ss in top of first hdc
(60 total stitches)

I STOPPED INCREASING HERE… hat diameter was 5 inches.  Be sure your total stitch count is an even number.

R7 – R12:  Alternate WHITE and RED Yarn every two rows
Ch2, 1hdc in each stitch, ss in top of first hdc

Once you have completed the 12th row, you will now begin the star stitch.  I do want to reference The Spruce as a resource for learning how to crochet the star stitch if you do not already know how to crochet it.

Star Stitch – this is a two-row stitch.  The first row of stitches will build the top half of the star and the second row of stitches will finish the bottom half of the star.  The star stitch needs to be completed on an even number of stitches.

First star stitch of the round…
Insert your hook into the 2nd chain from your hook and pull up a loop.  Insert your hook into the 3rd chain from your hook, and pull up a loop.  Insert your hook into the 4th chain from your hook and pull up a loop.  Insert your hook into the first stitch, and pull up a loop.  Then insert your hook into the next stitch and pull up a loop.  Then yarn over and pull your hook through all 6 loops.  Ch 1 to finish the stitch.

The next star stitch…
Insert your hook into the ch 1 you just made and pull up a loop.  Then insert your hook into the strands on the side of the last loop made in the prior stitch and pull up a loop.  Next, you will insert your hook into the ch space that the last loops of the prior stitch were worked in and pull up a loop, then pull up a loop in the next stitch, and then pull up another loop in the next stitch.  Yarn over and pull all 6 loops through, and then ch 1 to finish the stitch.

*When pulling up all six loops, be sure to keep your yarn loose.

R13:  BLUE YARN
Ch5, around completing the top portion of the star stitch, ss in ch2 spot
(30 total top half stars)

*do not chain 1 after you close the circle on the last start stitch (right before you ss) – it will make too big of a hole.

R14:  BLUE YARN
Ch2, 2hdc in each eye spot, ss into ch2 (30 total completed stars)

R15 – R16:  BLUE YARN
Repeat R13 and R14

R17 – R18:  RED YARN
Ch2, 1hdc in each stitch, ss (60 total stitches)

R19:  WHITE YARN
Ch1, 1sc in each stitch, ss (60 total stitches)

R20:  WHITE YARN
Ch1, 1rsc in each stitch, ss, and finish off (60 total stiches), finish off and weave in ends.
Length:  7.25 inches

Stars and Stripes Beanie

If you complete this project, I would love for you to share a picture in the comment section!  If you’re looking for the perfect 4th of July tote to pack the evenings snacks while waiting for the fireworks, check out Repeat Crafter Me.  Thanks for stopping by!

Cheers,
Lisa


Stars and Stripes Crochet Beanie - FREE Pattern


Stars and Stripes Crochet Beanie - FREE Pattern
15 Things to Evaluate Before Creating a Budget

15 Things to Evaluate Before Creating a Budget

15 Things to Evaluate BEFORE Creating a Budget… boy, typing these words makes me realize I am finally adulting and doing it well!  Before we jump into this post head first, I want to discuss a few things.  Budgeting has never been my strong suit nor has it ever been something I have strived to do.  I always thought budgeting put restraints on your lifestyle, and that was something I was not a big fan of.

Since we had always been a two-income household, budgeting was never a huge focus.  Then, right before our lil’ Moose was born, I lost my job.  Talk about panic time!  Thankfully, after some research, getting organized, and revamping our financials, we realized we could still live the lifestyle we wanted and flourish with one income.

With the success I have had with implementing my budgeting strategies and getting organized, I decided I really wanted to share them with my readers.  I will admit, this post is not for the frugal person that wants to live a minimalist lifestyle, in a tiny home, and only eat bean and cheese burritos.  I’m all about cutting costs and figuring out how to save a penny here and there, but we still do splurge   and go to Starbucks, dine out more than we should, and buy toys that our children do not need but want.  These tips are really for the person that wants to find ways to save a little extra, waste less, and know and be accountable for where their money is spent.

15 Things to do BEFORE Creating a Budget:

  1. What are your mandatory costs?
    These items are things that cannot be avoided and must be paid each month.  For example, a mortgage or rent payment is a necessary cost to avoid having to move.  However, spa appointments or carwashes are not necessary costs.
  2. When is each bill due?
    It is important to know exactly when each bill is due and how much is due at that time.  Also, are there penalties to being late?  If so, what are they?  If the due dates don’t fit well within your pay dates, be sure to contact the source and see if you can move the due date.
  3. Income
    How much do you make each month?  When are your pay dates?  Does your income fluxuate from each paycheck or are you salaried?
  4. Pay Dates
    When do you get paid?  How often do you get paid?  Are taxes taken out or are you responsible for saving for income taxes?  Does your pay fluctuate?  Are there times or seasons you must worry about down time?  If so, this would be a great time to map this out and plan your budget accordingly.
  5. Extra Income
    Do you have extra income from another source (Etsy, garage sales, craft fairs, child care, etc.)?  Are these streams of extra income more consistent during certain seasons?  If you can, map this out as well.
  6. Consider Events, Holidays, Birthdays, and Vacations
    Unfortunately, attending events, celebrating holidays, birthday ventures and vacations all take money!  It is imperative to plan for these events.  By planning and including them in your budget each month, you are much more likely to stay within your budget.  It will also help prevent unnecessary splurges that don’t fit within your budget.
  7. Cut Costs
    Of your mandatory costs, what can you reduce?  I suggest calling each place and discussing if there is a way to reduce your monthly bill.  A great place to start is insurance… just be sure that you don’t also reduce necessary coverage.  You want to save money, but not play Russian Roulette.
  8. What comprises your debt?
    As painful as this might seem, you need to write down every penny of debt you, your partner, and your family has.  Write down interest rates, due dates, and anything else that is imperative to know to pay off your debt.
  9. Record Your Spending
    This was groundbreaking for me and my husband!  To say the least, we had no idea how much money we were wasting.  After recording our spending for less than a month, I found so many ways that we could easily save without changing our lifestyle that much.  It was very enlightening.
  10. Make a Menu… and STICK TO IT!
    Cooking, grocery shopping, and saving money had never been spoken or typed in the same sentence prior to starting a budget.  However, when I realized we were spending over $1,000.00 per month on groceries (we are a family of four with two toddlers) and this did not include our dining out, my husband’s lunches, or Starbucks runs, I nearly fainted!  Make a menu and stick to it… even if it doesn’t sound good.  I do recommend having a flexible menu if you are new to menu planning.  Try to keep your menu simple and easy to make, so that sticking to it is easy in the beginning.  Leave trying new recipes and complicated ventures for later when you’ve perfected your menu planning skills.  Here is an example menu from when I first got started:Sunday – Cheesy Enchiladas, Mexican rice, and corn
    Monday – Spaghetti, green salad, green beans, and garlic bread
    Tuesday – Tacos or taco salads
    Wednesday – Breakfast foods
    Thursday – Baked chicken, broccoli and cheese rice, and steamed carrots
    Friday – Shish Kebabs, steamed rice, and grilled veggies
    Saturday – Dine outIn the beginning of my menu planning days, I only planned on dinner and then I just made sure to have items for breakfast, lunches, and snacks.  As menu planning got easier and I became more efficient, I started planning more meals and snacks.
  11. Make a Grocery List
    Make a grocery list of items you need to make your meals, but be sure to check your pantry before making your list.  There is nothing more irritating than realizing I wasted money on duplicate items.  Do not shop while you are hungry, the store is super busy, or if you have cranky children with you.  Also, be sure to have coupons ready to go (check expiration dates and any requirements for the coupons), use ibotta, and consider buying generic.
  12. How often are you going to the store?
    I recommend trying to reduce the number of times you go to the store.  It will save you transportation costs and reduce the opportunity to buy items that are not necessary.
  13. Get Organized!
    Being organized and budgeting go hand in hand.  It is hard to not to buy duplicate items if you can’t find anything in your pantry, or if you don’t know how much you spent yesterday before you lost your spending log.  Take the time to get organized and budgeting will be easier.
  14. Make sure everyone has the same goal and is on board the budget train!
    It is great you are ready to budget like a champ, but if your partner isn’t, the budgeting journey is probably going to be bumpy.  Like anything else in a relationship, you have a to be on the same page to make it successful.  If your partner isn’t there yet, maybe start chatting about wanting to start budgeting and all the positive reasons why it’s great for your family.  You could even start with just one thing… kind of get their feet wet before diving in head first.
  15. Execute, and Be Accountable and Consistent!
    If you are anything like me, this one is probably the hardest!  I am amazing at making lists, plans, and even having a process, but I am not always great at executing.  Be sure to have check points and if you have a partner that you are doing this with, have weekly meetings to make sure you are both staying on track.   

Phew… made it through the list!  I really hope you find these tips useful and that they help you save a few extra dollars each month.

Cheers to a penny save!
Lisa


15 Things to Evaluate Before Creating a Budget