Home » Archives for Lisa » Page 13

Author: Lisa

pumpkin-head-warmer-dreams-and-caffeine

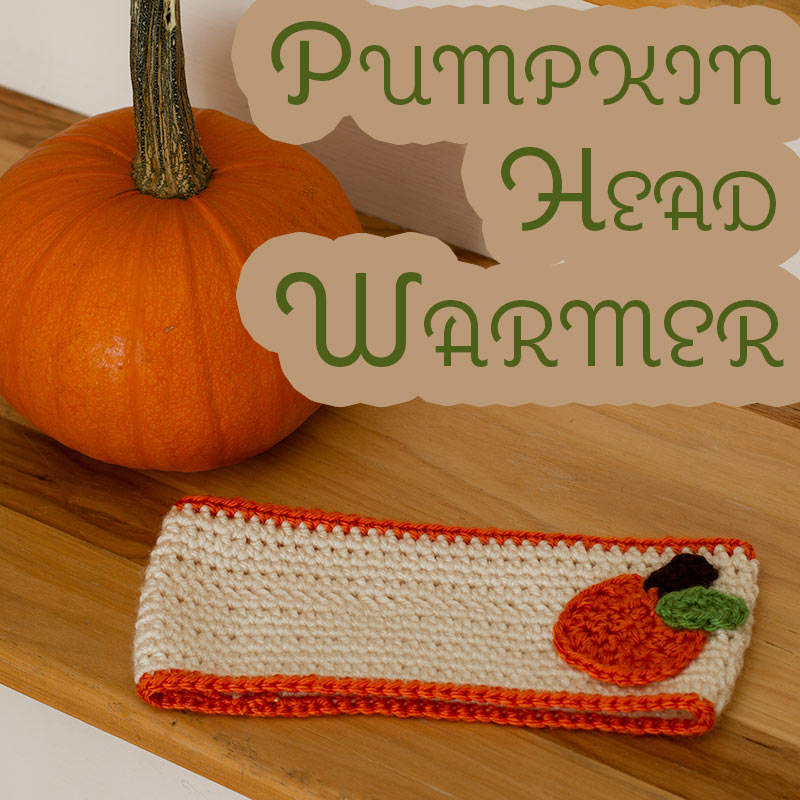
Pumpkin Head Warmer Crochet Pattern

Welcome everyone and I am pleased to say, HAPPY FALL!  It is my absolute favorite season… I love the cool, crisp weather, the rain, wearing sweaters, boots, and of course, head warmers.  Keeping with the season and gearing up for the pumpkin patch, I decided it was time to share my crochet Pumpkin Head Warmer!

Now the pattern that I am sharing will fit a toddler (completed project measures 18 inches in circumference).  If you would like a different size, just chain until your chain measures to the size you want.  Here is a quick reference guide for sizing.

Toddler             16” – 18”
Child                  17” – 19”
Teen                  18” – 21”
Adult                 20” – 22”

Supplies Needed to Complete Project:

  • Hook G 4.00 mm
  • Yarn:  I used Red Heart Soft in Off White, Tangerine, Chocolate, and Guacamole
  • Yarn Needle
  • Scissors
  • Measuring Tape

The Pumpkin Head Warmer: Toddler Size 18 inches

Using the OFF WHITE yarn, Chain 70, join with a slip stitch (careful not to twist)

*This pattern is worked in the round

Round 1:  ch 2, hdc in each stitch around then slip stitch into the first hdc.

Round 2:  ch 1, sc in in each stitch around then slip stitch into the first sc.

Round 3:  ch2, hdc in each stitch around then slip stitch into the first hdc.

Round 4:  ch 1, sc in each stitch around then slip stitch into the first sc.

Round 5:  ch 2, hdc in each stitch around then slip stitch into the first hdc.

Round 6:  ch 2, dc in each stitch around then slip stitch into the first dc.

Round 7:  ch 2, hdc in each stitch around then slip stitch into the first hdc.

Round 8:  ch 1, sc in each stitch around then slip stitch into the first sc.

Round 9:  ch 2, hdc in each stitch around then slip stitch into the first hdc.

Round 10:  ch 2, hdc in each stitch around then slip stitch into the first hdc.

CHANGE COLORS TO TANGERINE

Round 11:  ch 1, sc in each stitch around then slip stitch into first sc.

Cut yarn and weave in ends.

Round 12:  Attach TANGERINE yarn with a slip stitch to the bottom of the head warmer and ch 1, sc in each stitch around then slip stitch into the first sc.

Cut yarn and weave in ends.

Pumpkin

*Chains count in total stitch count.

Using the TANGERINE yarn, make a magic ring,

Round 1:  ch 2, 8 hdc in the magic ring, slip stitch into the top of ch 2 (9 total stitches)

Round 2:  ch 2, hdc in ch 2 spot, then 2 hdc in each stitch around.  Slip stitch into the top of ch 2  (18 total stitches)

Round 3:  ch 2, hdc in next 4 stitches, then place 2 hdc in next 2 stitches, then place 3 hdc in next stitch, then 2 hcd in next stitch, then 2 hdc in next stitch, then 3 hdc stitches in next stitch, then 2 hdc stitches in next stitch, then place 1 hdc in the next 4 stitches… so far you should have a total of 23 stitches.

CHANGE COLORS TO CHOCOLATE – you will be starting the stem now.

sc in next 2 stitches, ch 1 and turn

Round 4:  sc in next 3 stitches, ch 1 and turn

Round 5:  sc in next 3 stitches, cut yarn and weave in ends.

Leaf

Using the GUACAMOLE yarn, ch 5, sc in 2nd ch from the hook and the next 2 stitches.

4 sc stitches in the last chain spot, then sc in the next 3 stitches, slip stitch into the first sc. Cut yarn, making sure to leaving a long enough tail to sew the leaf to the head warmer.

Finally, all parts of the head warmer are completed!  Now it’s time to assemble it.  I put the seam in the back then placed the pumpkin on the front angled on the left side.  I used some tangerine yarn and sewed the pumpkin portion onto the head warmer.  Then I used chocolate yarn to sew the stem portion on.  Using the tail from the leaf, I sewed the leaf on, then weaved in all lose ends.  You now have an awesome Pumpkin Head Warmer for your adorable little pumpkin.  Please feel free to sell head warmers made from this pattern, but please do not sell this pattern.  I would love and appreciate a link back to this page if you do sell items made from my pattern.

As always, if you have any questions or issues with the pattern, please feel free to contact me and I will do my best to help.  If you do make a head warmer, I would love for you to share it!

Cheers to Pumpkins,
Lisa


Book Club Meet #3 - The Coincidence of Coconut Cake

Book Club #2 “Life Extension”

Extension time!  As all of you are probably all too aware of, things come up, and I’m going to extend the book club discussion date out to October 12th.  After that, we’ll start the next one on the 13th and go through November 30th.  Hope this gives everyone enough time to finish up and maybe we will even get a few new people to join in!

If you’re curious, here’s a link to the original book club post.

Cheers,
Lisa

pumpkin-cheesecake-parfait-dreams-and-caffeine

Pumpkin Cheesecake Parfait Recipe

Pumpkin cheesecake parfait… the only word that comes into my mind is YUMMY!  I was outside playing with the kiddos the other day and we started noticing the leaves changing colors on the trees.  It was so pretty and it reminded me that fall, which is my favorite season, was right around the corner.  I love the cold crisp sunny days, all of the beautiful colors that fall brings, and the aroma of pumpkin everywhere.  Speaking of pumpkin, I thought I’d share one of my favorite pumpkin recipes with you.

Pumpkin Cheesecake Parfait

Ingredients:

  • 8 oz. container of Cool Whip
  • 8 oz. package of Cream Cheese
  • 1 bag of Ginger Snap Cookies (graham crackers can be substituted)
  • 1 ½ cups Pumpkin Pie Mix
  • 1 Tbsp. Powdered Sugar (granulated sugar can be substituted, adjust amount as needed)

pumpkin-cheesecake-parfait-ingredients

Directions:

  1. Cream cheese should be at room temperature and Cool Whip should be defrosted.
  2. Put ginger snap cookies in a Ziploc bag and crush them to your preference. I prefer bigger chunks of cookie in my parfait, but if you prefer more of a crumble, have at it.  You can also substitute graham crackers if you don’t like or don’t have ginger snaps on hand.
  3. Cut cream cheese into cubes and place in large mixing bowl.
  4. Place the entire container of cool whip in mixing bowl.
  5. Mix until you have a nice thick and fluffy mixture.
  6. Now add the pumpkin pie mix to the fluffy mixture in the bowl… the mixture will thin out
  7. Add the powdered sugar
  8. Blend everything together.

Construction of Pumpkin Cheesecake Parfait:

  • Take parfait container and place a layer of crumbled ginger snap cookies in the bottom
  • Now put a layer of the pumpkin cheesecake filling in next. I used a small Ziploc bag and cut the tip of the corner off to keep from getting the sides or rim of my cup dirty… though shoveling it with a spoon works just as well.
  • One more layer of ginger snap cookies
  • Finally, one more layer of pumpkin cheesecake filling.
  • You can put whip cream on top, sprinkle some ginger snap cookie crumbs on top, or top with chocolate sprinkles.

Be sure to refrigerate the portion you don’t eat right away!  I love this recipe because it’s so easy and so flexible to make.  I will be making these Pumpkin Cheesecake Parfaits in little cups for our large family get-together this Thanksgiving.  Enjoy!

Cheers,
Lisa


Goodbye Binky - A Success Story - Dreams and Caffeine

Goodbye Binky… a Success Story

Yes, you read that correctly, we have successfully gotten rid of the binky.  I have to admit, it’s kind of a sad day, another milestone is met with success, but it just means that my tiny little baby girl is growing up.  I’m not quite sure how we went from the hospital for delivery to her now going without a pacifier… where has the time gone?!

As you will remember (if not, check out this post), a few weeks ago I posted a list of ideas of how to get rid of the binky.  It was full of various fun ideas to say goodbye to the binky… hopefully making the transition not too traumatic for my little one.  After much discussion, we decided to go with the Build-a-Bear Workshop.  We felt Miss Sassy Pants would have the most fun with that idea.

After we had the idea, we set the timeline… one week.  This would give me time to plan out a fun-filled day as well as to spend the week talking with Miss Sassy Pants about getting rid of her binky.  During the discussions I had with her, I just let her know that it was time to get rid of the binky, because she was such a big girl.  Now I do want to point out that Miss Sassy Pants only used a binky for nap time and bedtime and it was not allowed out of the crib.  So if your child is using the pacifier more frequently, you might want to reduce its use before taking it entirely away.

Saturday arrived and we were ready to go.  We of course wanted to keep it as relaxed as possible to prevent any additional stress for her.  I also had her pick out her four favorite binkies to put inside her bear that she was going to build.  I put them in a special bag which went in her backpack, giving her full control of the situation.

When we arrived at the Build-a-Bear workshop, I let the very helpful employee know what we were doing.  We took lots of pictures throughout the process… mainly because Miss Sassy Pants loves posing and I figured anything to keep her in a good mood would be beneficial.

Miss Sassy Pants selected Tender Heart (a Care Bear) and headed over to the stuffing station.  The lady controlling the stuffer was absolutely amazing.  She offered a little cloth heart to include in Tender Heart’s belly along with her binkies.  She had Miss Sassy Pants kiss each of her binkies as she put them in the bear and then before putting the cloth heart in, she asked if she could rub it on Miss Sassy Pant’s cheeks so Tender Heart would have a smile like hers… to say the least, my daughter absolutely loved the idea!

After Tender Heart was all put together with favorite binkies inside, we let Miss Sassy Pants go shopping for an outfit and any other items to wanted for her special bear.  In the end, she selected the cutest blue jeans, blue t-shirt, and red rain boots.  She also got a little brush to keep Tender Heart’s fur nice and fluffy and a birth certificate.  All in all, it was a super fun activity that she really enjoyed.

Once we were on our way home, we talked more about why we did the Build-a-Bear workshop and why we put her favorite binkies inside Tender Heart.  I didn’t want to lose the focus.

The first night was a little difficult because she thought she could get the binkies out of Tender Heart when she wanted them.  It was heartbreaking, but my husband and I both stayed strong and just comforted her and explained why she couldn’t have binkies anymore.  The second night was much easier!  She still needed some comforting, but she never asked for a binky!  We are still binky free and falling asleep has gotten much easier… almost back to normal.

Here are some suggestions that worked for us when getting rid of the binky

  1. Reduce the use of the binky prior to removing it all together.
  2. Make it fun… find something your kiddo will enjoy, hopefully making it less traumatic.
  3. Take the time to talk to them about it… explain why it’s time to get rid of the binky and how and when you’re going to get rid of the binky.
  4. Try to make the first day as stress-free as possible. The event of getting rid of the binky is stressful enough.
  5. Be patient, provide lots of comfort, and stay strong. As a parent, it can be so heartbreaking to see your child hurt, but in the end it’s in their best interest.

That’s it folks!  Happy Thursday!

Cheers,
Lisa